A close up shot of the Horseshoe (Canadian) Falls at Niagara Falls. You can really see the power of the water here!
I went for an early morning walk on our last day (Victoria Day) while there were not too many people about. It was a beautiful clear sunny morning, but the spray was quite intense, and the harsh light made for difficult shooting conditions. I walked up to the falls, then took this shot on the way back.
This was a single exposure, taken with my Pentax K200D and Tamron 17-50mm len with a Kenko Pro-Digital CPL filter fitted. All editing (levels and tiny straighten) were done in Lightoom 3.
This is the American Falls at Niagara Falls, viewed from the Canadian side of the border. I took this one quite late in the evening, on an after dinner walk. I was so stuffed full of food I had to walk some of it off.
This is a 3 shot HDR, taken at +/- 2.0 EV with the Pentax K200D and Tamron 17-50mm f2.8 lens.
I blended the shots with Photomatix and made some final adjusts in Lightroom.
I was lucky enough to be able to spend the Victoria Day long weekend down at Niagara. The weather for the weekend was great! And the falls and the parkland around them was beautiful. On Sunday I did a wine tour, and had my first ever taste of Ice Wine, followed by quite a few more tastes of Ice Wine soon after.
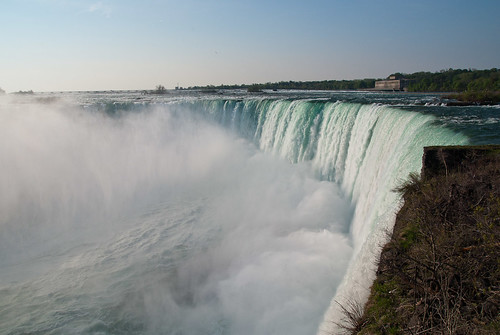
This shot is the Canadian Falls (Horseshoe Falls) taken from the Canadian side of the river. I took this one early on Monday morning (Victoria Day) before there were too many people around.
The amount of spray coming off the falls makes it very hard to get a good photo of it, but I think the spray in itself is a good subject, as seen here.
This is a single shot, taken with a Pentax K200D and a Sigma 10-20mm f4.0-5.6 with a Kenko 77mm CPL filter fitted. I cropped and adjusted the levels of the image in Lightroom.
I can’t remember the name of this waterfall. There is a lookout to view it on the downhill run from Queen Mary Falls to Kilarney.
This is just a CPL filter shot this time, but closed the aperture right down, turned Shake Reduction (IS/VR/OS whatever your manufacturer of choice calls it) and snapped away about 7 handheld shots at 0.5s exposure. This was the sharpest, and i think its pretty damn good!
Taken with Pentax K200D, Pentax SMC DA 18-55 AL II lens and Kenko CPL filter.
Processed in Lightroom 2.5, minor adjustments only.
This is Queen Mary Falls itself, in the Main Range National Park (at the very southern end).
Its a 2km loop walk to the bottom of the falls from the carpark and back, little steep at the beginning going down, but not too bad. I wandered down with my camera gear and tripod.
This is the very first shot i ever took with the Hoya NDX400 filter (once I had worked out the exposure). I have found with my body I need to set exposure compensation to +2.0 just to get the correct exposure when using the NDX400 filter. This isnt a real problem as generally I will be wanting to use exposures longer than 30 secs anyway, which means ill be into bulb mode territory.
This was shot using the Pentax K200D, Pentax SMC DA 18-55 AL II kit lens, Hoya NDX400 filter and Slik 500DX Pro tripod. It was processed in Lightroom 2.5 but I can’t quite remember what I did with it…
This is a HDR of the Twin Falls waterfalls at Springbrook National Park in the Gold Coast Hinterland. It was a very cloudy and very wet weekend, so I had to use HDR to prevent the sky from blowing out badly.
These falls are quite high and an impressive sight. If the weather were better I would have been keen for a swim in the pool. Maybe next time 
This was blended from 5 photos. To get the 5 shots, I set the camera exposure bias to -2.0 EV, then took 3 bracketed shots at /- 2.0 EV (giving -4, -2 and 0 EV) then quickly set the exposure bias to 2.0 EV and took 3 more bracketed shots (giving +4, +2 and 0 EV). I then have shots ranging from -4 to +4 EV in 2 EV steps. I delete 1 of the duplicate 0 EV shots and blend the remaining 5 in Photomatix.
This is a neat little trick if the normal +/- 2.0 EV bracketing is not enough for the scene being shot. In this case the white cloud above the waterfall was blown out in every shot except -4 EV.
A Blog of my Photographic Journeys, Equipment, Techniques and Images.